
Hamutal goes strawberry picking and shows us how to can our jam like a locavore
One of the great joys of eating seasonal, local food is the unabashed, seam-bursting happiness of eating something you haven’t seen since the last harvest. It’s the kind of excitement which comes from deprivation – food is always tastier when you’re hungry, and strawberries always sweeter, juicier, strawberrier, when you’ve not had them in months.

Another result of eating seasonally – when a fruit or vegetable finally ripens, all of a sudden you are absolutely swimming in it. If you’re anything like me, the embarrassment of riches leads to unbridled enthusiasm, which leads to eyes-bigger-than-tummy syndrome, which leads to, well, just what on earth am I going to do with all this stuff?
And thus we come to strawberry jam. Once upon a time, “putting food by”, preserving a crop at the peak of its season for use throughout the year, was common practice. Cucumbers were pickled, meat was salted, and herbs were dried. We think it’s high time for a resurgence.

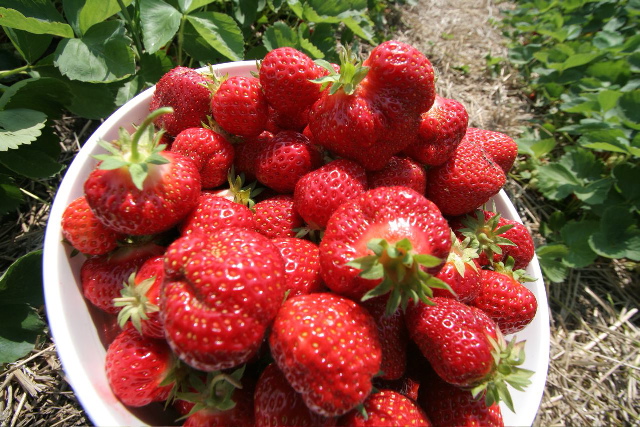
Pick your own organic strawberries if you can for your jam
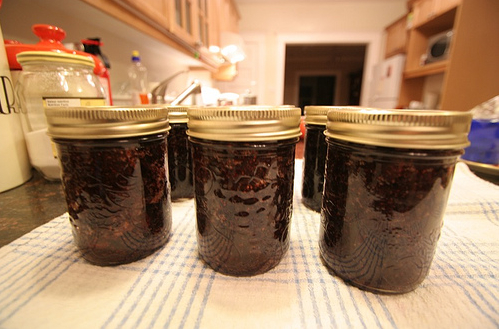
Strawberry jam, canned
Preserving’s air of mystique comes, we suspect, from the very reasonable concerns that most of us have about food safety. It seems entirely magical, and thus suspect, that the strawberries which would get mouldy in your fridge in under a week can, if boiled and put in a jar, stay safely on your shelf for months, or years. It’s the kind of alchemy we tend to feel is best left to the experts. But here’s the thing – preserving is actually incredibly easy, and incredibly safe. So long as you follow a few basic guidelines, you can have, by this time tomorrow, a shiny, glistening row of jam jars of your very own.
Homemade Strawberry Jam recipe
- 9 cups of washed, hulled, and lightly crushed strawberries (usually takes 7-8 quarts of berries)
- 6 cups sugar
- 1/2 cup lemon juice
Equipment
- 8 half-pint preserving jars, with lids and bands*, thoroughly washed with soap and water
- 1 extremely large pot with a fitted lid, for sterilizing the jars; the pot must be at least 3 inches taller than the jam jars you are using
- 1 cake or steamer rack that fits inside the extremely large pot
- 1 stock/soup pot, for cooking the preserves (use a big one – there will be lots of bubbling)
- 1 jar lifter (a plastic set of tongs for getting the jars in and out of the water)*
*available at kitchen and many hardware stores
1. Get the jam going. In the stock pot, combine the berries, sugar and lemon juice. Heat gradually until the sugar dissolves, then raise the heat and bring the berries to a boil. Continue to cook, stirring often to ensure that the bottom doesn’t scorch.

2. Skim off any foam that rises to the top of the pot. Don’t throw the foam out – it’s perfectly edible, and entirely delicious (the bubbles in the foam are caused by the rapid boiling, and contain nothing but strawberry goodness). When you’ve done with the jam-making, whiz the foam up with a bit of milk or cream in a blender, pour into popsicle molds, and freeze. These will be the best strawberry popsicles you have yet encountered.
Also, slip two small plates into the freezer – you’ll use those in a bit to test how “gelled” the jam is.
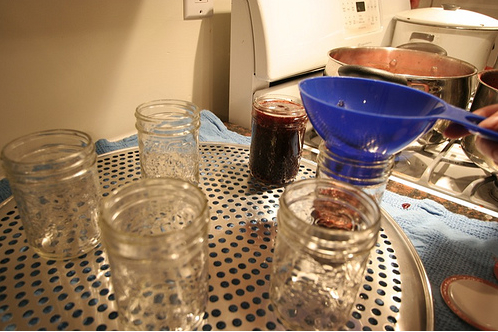
3. Meanwhile, sterilize your jars. Place the cake or steamer rack inside the extremely large pot. (From now on, we shall refer to this pot by its fancy preserving name: a hot water canner.) The purpose of the rack is to elevate the jam jars off the bottom of the pot, ensuring that water circulates all around them. Fill the pot with water almost to the top, cover, and set on high heat. When the water starts to boil, use the jar lifter to ease the canning jars into the pot. Make sure the jars fill completely, and are submerged. Once the water comes back to the boil, set a timer for 5 minutes.
When the timer goes off, put as many lids and bands into the pot as you have jars (you may need to do this all in batches), and set the timer for another five minutes. When the timer rings again – congratulations! you have successfully sterilized – use the tongs to fish the jars, lids, and bands out of the water, and place them all on clean dishtowels to drain. Keep the heat on under the canner.
4. Test the jam to see if it’s ready. By now it should have thickened a bit – it will drip slowly off a spoon that you dip into it, rather than running off rapidly like juice would. Take one of the plates out of the freezer, and plop on a small bit of jam. Return to the freezer for a minute or two. Take the plate out, and run your finger through the jam. Does it more or less stay put, retaining the trail traced by your finger? If so, you’re done! If the jam is still runny, keep cooking, and test again in a few minutes.
Canning the jam
5. Can your jam. Using a ladle, and a wide-mouth funnel if you have one, carefully fill the sterilized jars with your jam. You need the jars to be quite full: fill them to within 1/4″ to 1/2″ of the very top (technical term for this: headspace). Using a dampened paper towel, wipe the rims of all the jars, to ensure that they are clean and not sticky. (Any jam on the rim will prevent the formation of a tight vacuum seal.) Place the lids on the jars, and then lightly tighten the bands around them – stop turning as soon as you feel resistance. (The bands are there to keep the lids in place, and are not actually involved in sealing the jars. If you tighten the bands too much, they will prevent air from escaping the jar, which is the process you want to encourage.)
Using the tongs, return the filled jars to the hot water canner; if necessary, top up with more water, so that the jars are covered by at least 1″. Put the lid on, and when the water comes up to the boil, set a timer for 10 minutes. When the times goes off, remove the jars from the canner, and lay on clean dishtowels to cool. (You may hear a popping sound coming from the jars – this happens when the lids suddenly depress inwards slightly at the centre, as the air is driven out and a vacuum is formed. Popping sound = good.) Leave jars undisturbed for 24 hours (moving the jars, and especially touching the lids, can disturb or break the seals on the jars while they are cooling).
6. Check for a seal. If you’ve got a good vacuum seal, your jam is shelf-stable, and can be safely stored in the cupboard for at least a year. How do you know if you have a vacuum seal? One test: press down on the centre of the lid. If it has no give, and does not bounce back when you take your finger away, it’s good. Another test: remove the lid band, and try to pick the jar up just by using your fingertips on the lid. If you can successfully lift it, the seal is good. (What do you do with jars that failed to seal? Put them in the fridge – they will last for a month.)
Congratulations! You’ve made jam! Put in on your toast, stir into a bowlful of yogurt, or dollop it over ice cream. Open it in six months, and inhale deeply. Seasonal eating won’t seem so limiting after all.
All images courtesy Arieh Singer

Author: Hamutal Dotan
Hamutal never planned to become obsessed with food, much less with sustainable food. It crept up on her when she wasn’t looking. At first it was pure self-defense: her parents, though well intentioned, had no idea what to do in a kitchen, and so she had to learn a bit about cooking, sheerly for the sake of her sanity. Chopping things, it turned out, was great for soothing the savage teenager. Skip ahead several years, and she’d figured out that making your own jam from local organic berries was even grander. Love of food led to love cooking, led to love of ingredients, led to love of markets, led to love of farmers, led to love of land. Hamutal is profoundly convinced that sustainability and pleasure are the best of friends, and tries to write about both of these in equal measure. She can be reached at hamutal (at) green prophet (dot) com.


Do you grow your own strawberries? I’ve been meaning to plant them but work takes so much of my time, so I just buy them. If ever I have the time already, how can I make sure that the berries I grow will be sweet not bland? Any tips?
I tried doing this recently and it turned out a disaster. I found out later that I should have added pectin which is available in powdered from from some natural food stores. Some fruit such as citrus and apricots have a lot of natural pectin which is released during the cooking process. Strawberries unfortunately do not. It’s the pectin that enables the jam to thicken like it should.
What I did make was more like a heavy syrup and was great as a sauce. It only keeps for a couple of weeks in the fridge however.
Yup, pectin is essential.
My favorite Low carb diet recipe . I make it every summer! I should try this recipe, though. Sounds amazing!
That idea for using the froth in strawberry popsicles is very good, I will definitely try that the next time I make strawberry jam. I didn’t use a canner though, so I’m going to see if my jars magically sealed themselves when I get home today.
http://www.ecojoes.com/simple-easy-homemade-strawberry-jam-recipe/